Change DNS on PS4: Solve PS4 Network Issues
Let's change the DNS server for better!
With this guide, you will learn to change DNS on PS4. If you are unable to join a multilayer game or having issues with app, game, and update downloads on PS4, you should try changing the DNS server assigned for your console. This guide is designed to teach you just that and a little more about network settings on PS4.
Why Change DNS on PS4?
Before we teach take you through the procedure of changing DNS on PS4, we shall make it clear what DNS is (and yes, we won’t use fancy network engineering terms for doing that) and why changing it might help to solve network issues.
DNS (Domain Name System) is analogous to a telephone directory. DNS is used by devices connected to the internet for fetching details from websites. But what has your PS4 console got to do with DNS? Your PS4 must be connected to the internet at all times for its smooth functioning. Without the internet, you won’t be able to download the latest system patches and your PS4 won’t work as expected. DNS is required when your PS4 has to locate and fetch those update files from Sony servers.
If your PS4 is having difficulties communicating over the web when assigned to a single DNS server, you can try changing the DNS server addresses and find one that works best. You should definitely change the DNS address if you are facing this one issue on your PS4.
High Latency in Online Multiplayer Matches
Getting ping north of 60ms in Call of Duty Warzone but Activision has set up a dedicated server for your region, which is located only a few kilometers away from your home? Experiencing packet loss issues and ping spikes in online games? Something must be wrong with your current DNS server.
Your PS4 will be using the DNS server assigned to your router (and your ISP manages the DNS server through which its router communicates). In most cases, your ISP will be using an optimal DNS server for your location based on the traffic and all other factors but your ISP’s choice may not always be right.
Some of the DNS servers preferred by your ISP might face downtimes more often than others and if your router has one of those faulty servers assigned, you will face DNS-related issues more often on your console. There’s a simple technique for solving all things related to a faulty DNS assignment on PS4. Have the DNS server for your console (or the whole router) to more reliable ones like 8.8.8.8 (powered by Google) or 1.1.1.1 (powered by CloudFlare).

Changing the DNS server comes with more benefits like
Much Better Streaming Experience
Often use your PS4 for watching TV shows on Netflix? Your streaming experience might get a whole lot better with a new DNS server. Should your network speed improve, you will be able to jump through the video on Netflix without having to see that buffering sign.
Recommended for you! How to Cancel Kindle Unlimited In A Few Easy Steps
Your Network Performance Might Jump to the Next Level all of a Sudden
If your previous DNS server really was a bad one, changing to a reliable DNS can do wonders. Everything web-based will start happening at an instant if your new assigned DNS server performs remarkably faster compared to the previous one. One of the most reliable DNS servers you can use is Google’s 8.8.8.8. Our team experienced a 19% improvement (down to 86ms from 105ms) in Call of Duty Modern Warfare’s latency when Google’s DNS server was assigned to our PS4 Pro.
Now that you know what changing the DNS server might do with your PS4’s network performance, here are the steps to pull it off.
Changing the DNS settings on a PS4 is as simple as it can be. For now, we suggest that you use Google’s DNS on your PS4 and see how things react. If it appears that your network performance has improved significantly, don’t forget to let us know in the comments below!
Steps to Change DNS on PS4
Without further discussion, let’s jump right into the steps to change DNS on PS4:
- Go to your console’s Home Screen. Press the PS button on your controller and you will be returned to the Home Screen.
- Head over to ‘Settings’ by tapping the ‘X’ button on your controller (highlight the ‘Cog’ icon tile before pressing ‘X’).
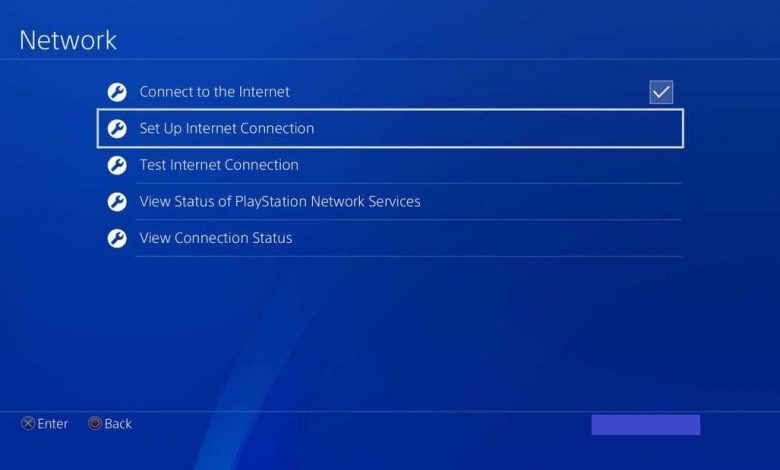
- Choose ‘Set Up Internet Connection’ option inside the ‘Network’ section within ‘Settings’.
- Using a wired connection? Choose LAN Cable. It’s highly recommended that you use a wired connection for the best online gaming performance on PS4. WiFi should only be used as a last resort.
- For changing DNS, you will have to go with ‘Custom’ to specify a new DNS server for your PS4.
- In the next screen, choose ‘Automatic’.
- For ‘DHCP Host Name’, choose ‘Do Not Specify’. This step is very important.
- Make sure the ‘DNS Setting’ has been set to ‘Manual’.
- In the fields for primary and secondary DNS addresses, type in 8.8.8.8 and 8.8.4.4 respectively.
Also check out! Fortnite Error Code 93: Can’t Join a Party? Let’s Fix That!
Will I Get Banned for Changing DNS?
Not at all! By changing the DNS server, you aren’t jailbreaking your PS4 or doing anything too serious. You are only asking the console to use a different phonebook for calling data centers (for fetching data, of course) on the web. It has nothing to do with your games, apps, and system software on your PS4. Therefore, let your mind be at peace when you are changing the DNS settings on your console. If you are doing anything by changing DNS on the console, it’s just that you are optimizing the network performance (or trying to do so). Just make sure you assign the new DNS server for your PS4 from a provider with a clean track record. We recommend sticking to Google and Cloudflare.


