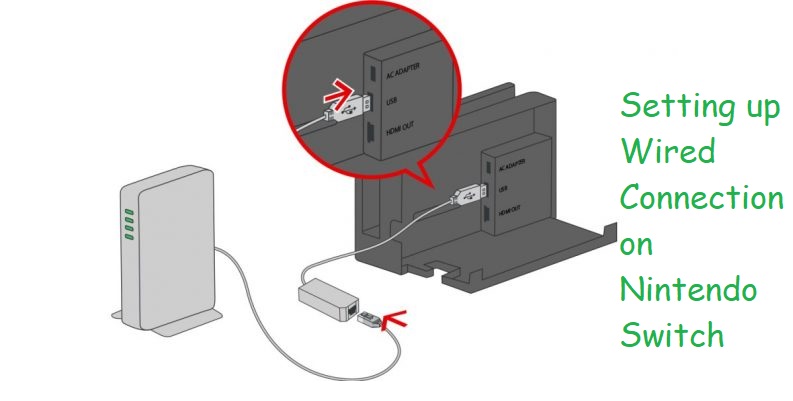
Want to set up wired connection on your Nintendo Switch console? This guide will walk you through the steps involved in configuring wired connection on a Nintendo Switch even though none of the models released to this day ship with an ethernet port. While it’s true that Nintendo has included a good enough WiFi adapter with its Switch console, some players might want to take it a little further by hooking their console directly to the router (hence leaving no stone unturned to build the ultimate competitive setup).
Why is Wired Connection Better?
Wired connection is the way to go if you are serious about online multiplayer matches. I, for one, hate it when my gamertag is not on top of the leaderboard after a match is over.
If a wired connection were that very important, why didn’t Nintendo include an ethernet port in Switch? The console was designed to be portable and therefore, Nintendo had to do everything to make sure gamers didn’t have to work too hard for carrying a Switch around. Simply removing an ethernet port does miracle to the size of a device (MacBook Air, for instance).
Having issues with your MacBook? You should check out ‘How to Fix the Bluetooth not available Mac Issue?‘
Just like Apple came up with an ethernet dock for MacBook Air, Nintendo has also introduced one for its Switch console. And although you might find it not too compelling to be carrying around an ethernet dock everywhere you go with your console, here are a couple of reasons why you should set up a wired connection for Nintendo Switch:
- WiFi connection always has packet loss and stability issues because of this thing called interference. A WiFi connection is not always reliable and the worst aspect of WiFi is packet loss. When you are losing packets, your inputs are not registered well and your movements don’t reach the server in time resulting in rubber banding and missed shots. You will see that you have hit the target like a thousand times on your screen but it just won’t die. If you are facing packet loss issues, switching to a wired connection on Nintendo Switch will take your online gaming experience to a whole new level.
- A wired connection offers better download speed compared to WiFi. Although Nintendo Switch games don’t come in too large (as is the case with PS5 and Xbox Series X), having a faster connection is always preferable.
- Having a wired connection for your Nintendo Switch is like tying it to the table or bed (or wherever you have set your console up) but you can consider this reduction in mobility to be the cost for stability you will get.
Setting up a Wired Connection on Nintendo Switch
Since Nintendo Switch does not come with an ethernet adapter, no matter how hard you look for it, you are not going to find that port for inserting the LAN cable. You will have to separately purchase a LAN adapter and use it for hooking your Switch to the router through a CAT6 cable (you can always use CAT5e but CAT6 offers better latency and reduced packet loss).
Order a set that includes an ethernet adapter and a LAN cable for your Nintendo Switch off NewEgg and you are ready to set this thing up!
Check this one out! How to Tame a Fox in Minecraft?
While ordering the set, try to keep the ethernet adapter compact and use a longer LAN wire in case you have the router in another room. You will hardly find ethernet adapters with longer USB cables. Make sure you are ordering the right length of LAN wire if you are purchasing a set. Sometimes, those sets include cables that are only a meter or two and are no good for connecting to that router in a faraway corner of your home.
Steps for Setting up LAN Connection on Nintendo Switch
- You will have to first locate the USB port on the back panel of your Nintendo Switch. Insert that USB cable from the ethernet adapter to this port on your console.
- Grab your LAN cable and insert one of its ends to the ethernet adapter.
- The other end goes to your router’s LAN port.
Configuring Wired Connection
- Once those wires are connected correctly, head to ‘System Settings’ on your console.
- Access the ‘Internet’ tab.
- Choose ‘Internet Settings’.
- In the next screen, wait until ‘Wired Connection’ becomes accessible.
- Select the option for connecting to the internet via wired connection.
Your console will now test the wired connection and once the system determines it meets all the requirements for online gaming, you will be ready to hit the battlefield!