If you are new to Mac computer and want to take screenshots on the problem you meet, you may find there is no PrtSc button like Windows on the keyboard. Don’t worry, it also provides several built-in tools and professional program for you. Whether you need to take a screenshot for work, school projects, or image compilations, you can screenshot them on Mac in various methods you will find in this post.
Guide List:
- Part 1: The Best Way to Take Screenshots on Mac with High-Quality
- Part 2: How to Take Screenshots on Mac through the Default Shortcuts
- Conclusion
Part 1: The Best Way to Take Screenshots on Mac with High Quality
If you are still not familiar with the Mac keyboard, the best method to take a screenshot on Mac is through AnyRec Screen Recorder. Its Snapshot feature gives you the best image quality for screenshots which you can save in JPEG, PNG, BMP, TIFF, or GIF format. You can also add notes with the built-in editing tools, consisting of add-ons and elements such as a paintbrush, cropper, numbers, text, and more. AnyRec Screen Recorder is the best software for editing and taking screenshots on Mac.
- Take a screenshot on Mac and Windows OS with custom screen region selection.
- Allow users to change formats, resolution, quality, and aspect ratio before saving.
- Support adding annotations in real-time with shapes, lines, texts, highlights, etc.
- Provide more valuable features, including game, phone, audio, and webcam recorders.
How to take a screenshot on Mac using AnyRec Screen Recorder:
Step 1: Download the software from the official website. Once done, install and launch AnyRec Screen Recorder on your device to start taking a screenshot on Mac.
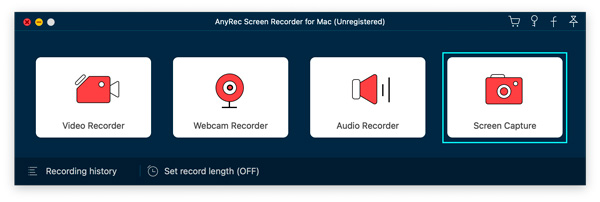
Step 2: On the main menu, click the SnapShot option. Your cursor will automatically change into a cross gridline. Hold and left-click your mouse, then move it to the desired region of your screen. The Snapshot will capture once you let go, and the Widget menu will appear.

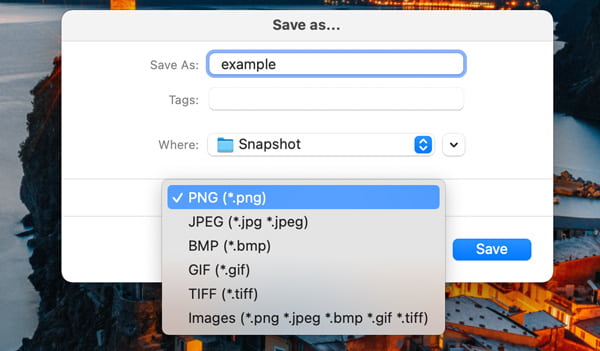
Step 3: Edit the photo using the real-time drawing effects provided by the Widget menu. You can use more editing features, including copy, full-screen, pin to screen, and crop a screenshot on Mac.

Step 4: After that, choose the desired image format and click the Save button to export the screenshot to the designated folder.
Part 2: How to Take Screenshots on Mac through the Default Shortcuts
This part of the post will show you every default command for taking screenshots on Mac and how they execute their purposes. Although you don’t need to download programs, they only provides several capture mode without any editing function.
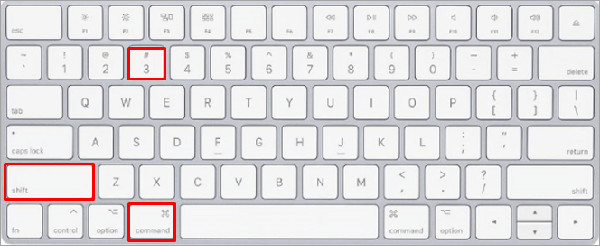
| Keyboard Hotkey | Purpose |
| Command + Shift + 3 | Full-screen screenshots on Mac. |
| Command + Shift + 4 | Take a screenshot on Mac in any region. |
| Command + Shift+ 4 + Space Bar | Cursor will turn into a Camera icon and take a screenshot to the pointed window or page. |
| Command + Shift + 5 | Launch the Screenshot tool to edit images and record videos. |
| Command + Shift + 6 | Take a screenshot on the Touch Bar on Mac. |
Method 1:
When you simultaneously press the command + shift + 3 buttons, it will take a screenshot on Mac in fullscreen. A smaller window will appear on the right part of your screen. Click it to edit and save the image.
Method 2:
Using the command + shift + 4 for taking a screenshot on Mac will capture the screen in any region. This command can also be used to take a screenshot on a menu.
The command + shift + 4 + space bar is slightly different from the first one. When you use this, the cursor will turn into a camera icon. When you point it to a window, left-click your mouse, and it will capture.
Method 3:
The command + shift + 5 will launch the screenshot tool to capture video and edit a screenshot. It offers other elements to input into your image, including lines, arrows, text, and numbers.
Method 4:
Lastly, command + shift + 6 is unique to taking a screenshot on Mac because it will capture the Touch Bar instead of capturing the content onscreen. Of course, this method is only applicable to users with Touch Bar on their Mac.
Conclusion
Now that you have seen and learned the different ways to take a screenshot on Mac, and you can capture precious time on video chat site, interesting messages with your friends, and record your gameplay clear moment. But if you feel like you are limited to Mac’s default ways of taking screenshots, use the AnyRec Screen Recorder for a broader method to take a screenshot on Mac. You can also customize the hotkeys to the ones you are familiar with. Invest in a powerful tool for a more advanced experience!
Read Next: 5 Legitimate Ways To Get Free Xbox Live Codes